Step-by-Step Guide: How to Sell Your Property in Germany
Would you like to know what to consider when selling your house or apartment? Don't want to pay a real estate agent? We show you what to do!Updated on July 15, 2025

As mortgage experts, we have seen thousands of transactions flow through our platform in the past years. The following article is a detailed step-by-step guide to help you structure the sale of your property in Germany. This guide is focused on property owners that are looking to sell their property privately without the use of a real estate agent.
- Step 1: Market analysis
- Step 2: Evaluate your property
- Step 3: Home stage your property
- Step 4: Take professional photos
- Step 5: Compile property documents
- Step 6: Nail the online property listing
- Step 7: Setting the right sales price
- Step 8: Viewing appointments
- Step 9: Check your buyer’s finances
- Step 10: Moving on to the notary phase
- Step 11: Handing over your property
Step 1: Market analysis
Understanding the real estate market is the first step to selling your property. Analyze comparable properties and tailor your listing to match buyers’ search criteria. For the analysis, we recommend reviewing listings in large portals such as ImmobilienScout24 (IS24), Immowelt, Kleinanzeigen.de, and Ohne-Makler.net. You want to set the search filters in a way that most closely resembles the features of your property – important features such as vacant/rented, room number, floor area, floor number, balcony, etc. are key.
In addition to the specific market research of comparable properties, there are also several 'price atlases' from IS24 or Homeday that allow you to search for your specific address and will return average current prices per square meter. Keep in mind that these atlases don’t distinguish between vacant and rented properties. The price gap between these types of properties can be as high as 50%. However, the price/m² will give you a decent indication of what your property might be worth and sell for later. It is important to be aware that the listing prices that you will see online are, often, not the final selling prices. Final sales prices that are notarized in the end tend to be somewhat lower. However, this will depend greatly on how motivated the seller is to sell the property fast. The stronger the desire to sell fast, the more room for price negotiation there usually is. However, depending on the ratio of supply-to-demand in the residential area the property is located in, the final selling price may well be higher than the asking price.
Step 2: Evaluate your property
In this step, you will want to determine how much your property is worth, as seen through the lens of banks and appraisers. This is known as the market value (= 'Verkehrswert' or 'Marktwert'). Fundamentally, three main methods in Germany are used to calculate a property value. There is the comparative value method (= 'Vergleichswertverfahren'), the asset value method (= 'Sachwertverfahren'), and the earnings value method (= 'Ertragswertverfahren').
For vacant apartments, single/semi-detached family houses, or plots of land, the comparative method is used as the standard method because there are usually sufficient data points of past transactions of comparable properties. Importantly, this method considers actual sales prices that consider common factors such as location, size, and condition. The focus of this guide lies primarily in this method. The other two methods are less relevant because the asset method is relevant for plots of land that have commercial buildings built on them. The earnings method focuses on rented multifamily houses and commercial units.
Now, you could hire a certified appraiser, spend around 500-2.000 € for that service, and receive a tangible report with a pretty accurate (but possibly lower than expected) value estimate. The smarter and much cheaper method would be to use several data-driven software valuation tools used by banks that will look at a larger range of valuation data points. One such free valuation tool is Hypofriend’s own property valuation tool, which can be accessed through the Hypofriend Property Radar. The underlying valuation engine uses PriceHubble, which is one of the most data-driven valuation tools in German-speaking countries.
The valuation tools used internally by banks are usually not free of cost. However, all Hypofriend advisors have access to the most important ones, namely Sprengnetter, LORA, GSD, and VDP. In particular, Sprengnetter and LORA are widely used by German lenders. By sending your Hypofriend advisor details about your property (ideally the Exposé when you bought the property), you will usually receive several valuation professional reports within 24 hours, completely free of cost. Typically, these reports will show a possible sales price range that your property falls within. Having concrete value estimates from 3 to 5 reports will provide you with a fantastic basis to support the sales price you will want to advertise (explained in detail in step 7).
In addition to these valuations, we would still recommend selecting 2 to 3 local real estate agents and receiving valuations from them. These valuations are usually free of cost, and there is no commitment to sell through them and pay them the typical 3,57 % commission as a seller.
Be aware that agents tend to be too optimistic with their appraisals, hoping to lure you in as a potential customer by anchoring your price expectation higher than what you thought was possible. There can be a significant gap between the values you determined from the above software valuation tools and the valuations you receive from overly optimistic agents. With that being said, agents selling in your area are a great source of knowledge when it comes to understanding at what price/m² they have sold comparable properties in past transactions.
If you are keen to work with an agent, reach out to your Hypofriend advisor to receive a recommendation for a trusted agent partner.
Step 3: Home stage your property
Look at your property with as neutral eyes as possible. Be sure to make minor repairs or renovations upfront to enhance the value of the property. Similar to selling a car, where you take it to a refurbisher before you advertise it, your property should be specifically prepared for the sales process. In this context, so-called home staging is becoming increasingly popular, i.e., the staging or the targeted ‘styling’ of your property. The goal is to make the house appear as neutral, comfortable, and as spacious as possible so that future buyers can see themselves living there. A recent study in 2022 among home staging professionals found that staged homes sell 5–11 times faster and help increase the sales price by up to 20 %. A staged property should give interested buyers a spatial idea of how the furniture in each room could be arranged and how that contributes to creating a ‘feel-good’ home.
If you currently live in the property you are looking to sell, make sure to remove unnecessary clutter and personal items that could convey a messy and unorganized impression of your place. You want to create a clean and organized look with enough furniture to gauge the rooms’ dimensions and imagine where their sofa, table, sideboard, rug, etc. could be positioned. The idea is to create a neutral canvas for future buyers to envision your place as their future home.
If you have already moved out and your property is vacant, you could invest a few thousand Euros in buying your own real furniture to stage your property. You could then reuse this furniture for the property that you live in. The alternative is to invest in a home-staging service. The German Society for Home Staging and Redesign e.V. has a Germany-wide directory of home staging experts.
Step 4: Take professional photos
Taking professional photos is absolutely critical to selling your property. Great photos will get the attention of interested buyers in the property listing. The better you display your property, the more contact requests you will generate. Unless you have professional camera equipment, photo editing skills, and a wide-angle lens, it will be worth the investment of around 200-500 € (depending on the size/type of the property) to hire a professional interior photographer. Such photographers shoot properties on a daily basis and are well-trained in capturing properties from the most favorable angles and in the best light possible.
The photos need to be bright and airy; ideally, they should be taken on a bright day when the sun floods the apartment/house. Make sure to include images of the exterior view, view from the garden or from the house to the garden, bathroom, kitchen, and special features such as a fireplace, stove, sauna, and flooring. The shots can also accentuate special features such as doorway arches, door handles, bathroom finishing, etc. If there is a great view from the rooms, make sure to include a photo of it. If you are selling an apartment, take photos of the outside building and surroundings if they are favorable. The most impactful picture should serve as the listing’s cover photo – it is quite literally the ‘money shot’. The better the photos, the more likely it will catch the attention of a person browsing through dozens of listings.
If you have already hired a professional photographer, you might also want to have a video tour shot. This will add a dynamic component to the viewing experience that many prospective buyers will find helpful. On top of a video tour, you could also have an entire 3D tour created of your property. This technique is used by an increasing number of agents in Germany. Similar to Google Maps, you get to virtually walk around the interior of your property and get a fantastic sense of each room. Matterport is the market leader for 3D interior photography.
Step 5: Compile property documents
In the run-up to the sale, you should compile the following important documents. These can be categorized between documents that are essential for a buyer’s mortgage application and documents that the buyer will want to have to carry out their own diligence on the property.
Not all residential properties will come with the same set of property documents. The two main property categories one has to be distinguished between as follows:
Category A: Apartment (= 'Wohnung' or 'Etagenwohnung')
Category B: Single family house (= 'Einfamilienhaus') + Duplex (= 'Doppelhaushälfte') + Town/row house (= 'Reihenhaus')
While most of the property documents are identical for the two property categories, they are unique to each category.
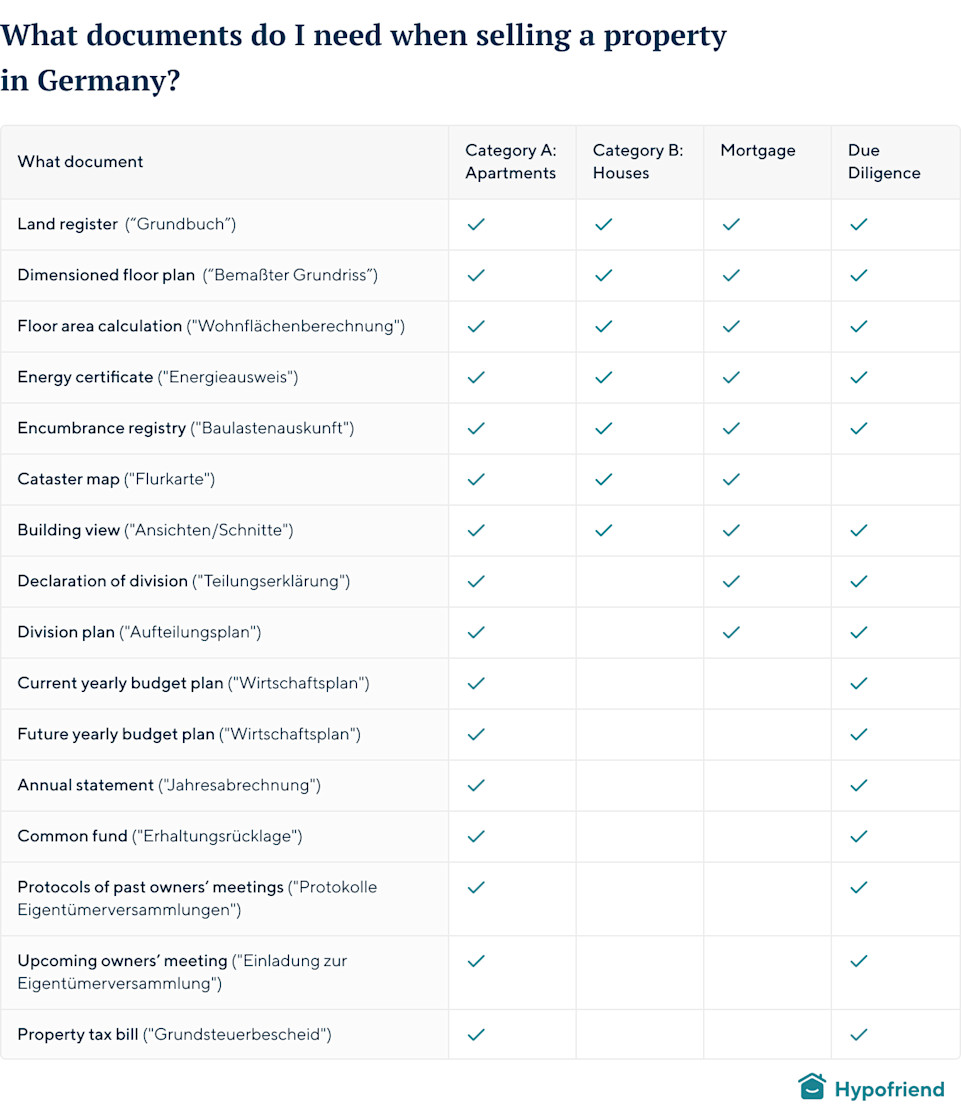
It is sometimes rather difficult to get all these documents organized, as they are often stored in different places or with different people. In addition, the German terms are quite difficult to understand. Here is an overview of where to find property documents and what they are called in German:

Step 6: Nail the online property listing
Advertising your listing online is absolutely essential in the 21st century. However, deciding which property portal to advertise on is not necessarily as obvious. You usually have to make a compromise between how much you are willing to spend for your listing and to what extent you want to maximize the listing’s online presence to reach the highest number of prospective buyers.
Most sellers will consider Immobilienscout24 to be the go-to platform, since this is likely the platform where they found their property when they initially bought it. Since Immobilienscout24 is the largest listing platform in Germany, it also commands the highest listing prices, even for a private seller looking to sell commission-free. A smarter approach would be to publish the listing on Ohne-Makler.net (OM). This platform only features commission-free properties and has the benefit of publishing the listing directly on large portals such as Immobilienscout24 or Immowelt at a lower cost than going to each platform directly.
To skip high broker fees and directly access thousands of qualified buyers, you can also get your property listed on our Hypofriend Property Radar.
The primary goal of creating and publishing a listing is to pique the interest of viewers and have them reach out to you to get more details and arrange a viewing. To do so, your listing needs to be as appealing as possible. Focusing on the following aspects will help your listing stand out from the online crowd:
Cover photo: the cover photo being displayed in a listing’s thumbnail is the most important feature that will catch somebody’s attention at first glance. This needs to be a photo that features the highlight of the property. For example, if the living room is spacious, light, and well-staged with furniture, use this as your cover photo. Or, if the view from the balcony or the building itself is unique (e.g., Altbau with exterior stucco elements) and sets you apart from the competition, that’s your cover photo.
Listing title: similar to the cover photo, the title should focus on highlighting the features of the property. These could answer the following questions:
Is the sale commission-free?
Is the property ready to move in?
How many rooms does it have?
Is the property located in a desirable neighborhood?
Is the property light?
Has the property been recently renovated?
Is the floor plan particularly spacious?
Is the property particularly energy efficient?
An example listing could read: “Commission-Free & Newly Renovated | Spacious 3-Room Apartment in Desirable X Neighborhood”
Property Description: Think about the special features of your property and the benefits it will offer future residents. List out the show-stopping features of the apartment, such as which floor it is on, whether it is connected to an elevator, whether the balcony is south-facing, ceiling height, does the bathroom have a window, is a separate parking space (garage), special access to a private garden, etc. Mentioning features in bullet point format is an effective way of not writing texts that are too long and won’t be read by prospective buyers.
Floor plan: It is essential to include a professional digital floor plan. A floor plan that is hand-drawn is a No-Go. Ideally, the floor plan has dimensions so that prospective buyers can envision the space and scope out their furniture – but it’s not a must. The standard method is to upload the floor plan as a PDF file. However, a better way would be to include the floor plan as part of the photos and feature it as the third or fourth photo after the most representative photos. This way, prospective buyers can decide whether to click the listing to see it in detail when scrolling through photos in the thumbnail view.
Transparency: Don’t try to hide (unfavorable) information about your property. Any defects about the property should not be concealed. The disadvantages will be reflected in the price. For example, a ground-floor apartment is usually cheaper per square meter than a property located higher up. Or, if the property has a particularly high monthly maintenance fee, mention it in the listing. The same applies if the property is next to a busy street, located in the back building,1or does not have an elevator if it is located on the top floor. It would be a waste of time for interested buyers to find out undesirable information later on. It is important to communicate truthfully but still accentuate the positives mentioned in the property description. However, praising the property in the highest tones that go beyond the facts will, at best, attract visitors but not buyers.
Exact address: Be open about where the property is exactly located so that prospective buyers can study the surrounding area (via Google Street View) in detail and potentially walk past it. This will filter out prospective buyers that were not serious to begin with and save you time. Buyers who are seriously interested will already have studied the location in detail before committing to a concrete interior viewing. Most real estate agents will usually only display the property’s zip code for fear of other agents reaching out to the owner.
Don’t reveal everything: even though we advocate transparency and not concealing negatives, you should also keep some features as positive surprises for the viewing later on. It will positively surprise prospective buyers and keep them curious.
Step 7: Setting the right sales price
Setting an initial sales price that is too high, thinking you have room to negotiate, is fundamentally wrong. This is because a property offered at a price that is too high will scare off many prospective buyers from the outset. Within the first 3–4 days of publishing the listing, you should expect to receive the highest influx of requests from prospective buyers. This is also when the novelty factor of your listing is the highest, and it creates a sense of urgency within prospects to reach out and view the property as soon as possible. In an environment where interest rates have risen sharply in 2022, buyers’ demand is no longer at the all-time highs present during the years of very low interest rates of around 1 %. This has a direct effect on the period it will take to find the right buyer for your property. Don’t expect to sell your property within a few weeks of you publishing it online. You should realistically expect a marketing period of around 3–6 months.
One common mistake is to gradually decrease the sales price as a result of too little demand from prospects. Interested prospects that save your listing as a favorite will automatically be notified about any price changes. This will devalue your property in the eyes of keen prospects, leading to them completely losing interest. Therefore, it is more effective to set a slightly lower price and stick with this price for the entire duration of your online listing. Should you end up with several buyers willing to offer the listing price, you could still ask each party for their highest bid. However, be cautious with this approach, as you might quickly lose concrete buyers and end up with nobody. It is sometimes better to accept a slightly lower price from a buyer with an approved mortgage as opposed to a buyer at a higher price whose mortgage process has not been initiated yet and would take significantly longer to notarize the sale. In the end, it comes down to how quickly you, as the owner, want to sell your property. If you want to sell quickly (< 1 month), that will need to be reflected in a lower-than-average price. If you have time (> 3 months) and no pressure to sell at all, then you could attempt to achieve a higher sales price. It’s all about finding the sweet spot with the price and keeping in mind that you only need one buyer – not several ones.
Step 8: Viewing appointments
When you finally receive contact requests for your listing, make sure to respond quickly, at the latest within 24 hours. At this point, a prospective buyer will already have the exact property address and will want to view the property to get a comprehensive impression. We would recommend calling the prospect if they have left a telephone number. This way, you can gauge their interest, investigate how they plan to finance the purchase, and clarify any questions about the property upfront. It also makes sense to share all property documents so that they can review them before an actual viewing appointment. An efficient way of scheduling viewing appointments would be to make your own calendar available (a tool such as Calendly works well for this).
When it comes to the actual viewing, you want to create a feel-good atmosphere. The same rules apply when you take photos of the space. You want to clear the interior of any unnecessary clutter and free up surface areas and the basement. This way, the client can envision their own furniture on your property and won’t be distracted by your items. The house should be clean, well-ventilated, and smell pleasant. If you are a smoker, you should try not to smoke in your home for at least four weeks prior to selling the house. If it is not a bright day or the viewing is taking place in the evening, turn on the lights and create a warm, inviting environment for the potential buyer to enjoy.
Step 9: Check your buyer’s finances
When you have finally identified a buyer who seems very keen to buy your property, it is time to conduct due diligence on the buyer’s finances. The goal is to ensure that your buyer will be able to either cover all the purchase costs (purchase price + purchase fees) completely from their own savings or, in a more likely scenario, be eligible for a mortgage to finance part of the purchase price.
When financing with a mortgage, it is advisable to ask the buyer for a finance certificate that is issued by a mortgage expert who has verified the buyer’s income and equity situation. Hypofriend has issued thousands of finance certificates in the past. Doing so has instilled trust in sellers/agents and conveyed that this pre-qualified buyer is trustworthy and eligible for a mortgage.
Even when you have identified a concrete buyer, do not rejoice too early, as this buyer might still pull out at the last minute for whatever reason. Don’t make yourself dependent on a single potential buyer by prematurely deactivating your property listing. Instead, we advise you to keep your online listing active and continue carrying out viewing appointments until the day when you sign the sales contract with a buyer at the notary. Your property is not sold unless you have notarized the sale, and no pre-sales agreement in Germany exists (unless notarized), which will guarantee that a buyer needs to legally commit to buying your property.
Step 10: Moving on to the notary phase
In Germany, no agreement is legally binding unless the buyer and seller have notarized a purchase contract in person at a publicly appointed notary. This is why it is essential to kick off the notary process as soon as a suitable buyer has been identified. To do so, the buyer needs to commission any notary of their choice with the drafting of a purchase contract (this can be done in writing via email). This has to explicitly come from the buyer, as the buyer will be paying any purchase-related notary fees. Even if the purchase should fall through for whatever reason, the buyer will still need to pay the notary for the drafting cost (stipulated by the German notary rule book).
At Hypofriend, we usually recommend buyers only commission a draft purchase contract once the mortgage has been conclusively approved. However, as a seller, you would rather not waste too much time waiting for your buyer’s mortgage approval without them showing concrete commitment to buying your property in the meantime. The strongest signal for this buying commitment will occur when the buyer commissions a draft purchase contract.
The draft will cost the buyer around 1 % of the purchase price (regardless of whether or not the purchase contract is later notarized with you). Whenever somebody commits financially, the likelihood of them following through with the purchase of your property is a lot higher than somebody just making you wait without concrete commitments.
Once the notary sends out the draft via email, you will typically have sufficient time to make suggestions/amendments. However, any changes that are made to the draft are not final. The goal in the lead-up phase to the actual signing appointment is to agree on the most crucial points (liability, handover, warranty, etc.). Even during the actual signing appointment, changes on the fly can be made to the contract if both buyers and sellers agree to them. For more details, check out the extensive 10-step guide on the notary process we have written.
Before you sign the purchase contract, make sure to see a bank-specific mortgage approval letter from the buyer. Alternatively, if the buyer provides the notary with their bank’s land charge document (= 'Grundschuldbestellungsurkunde'), this also serves as proof that their mortgage has been approved (the bank would not issue the land charge document without approving a mortgage). We also recommend that you demand to see a current bank account statement to prove that the buyer has enough equity to cover the downpayment and the purchase fees.
Step 11: Handing over your property
Usually, the most time-consuming and stressful phase for both the buyer and seller is concluded when the purchase contract is finally signed. After that, you, as the seller, don’t have to do much other than wait to be notified by the notary that the payment of the purchase price has become due to the buyer. This notice will usually come 6–8 weeks after notarizing the purchase contract. Once the buyer has paid (and/or instructed their bank to pay out their loan amount), you confirm to the notary that you have received the full purchase price in your bank account. At this point, it is time to prepare your property and schedule an appointment for the day of the official handover to the new owner.
If you are handing over a vacant property, it is needless to say that the property should be completely emptied of any personal items or furniture. However, if you agreed, for example, that the built-in kitchen was to stay and was part of the sales price, then the kitchen must remain in the same state as it had been when the buyer viewed your property. It is advisable to prepare a handover protocol where you record the following points:
Date of handover
Property address
Meter reading on the following:
Heaters in all rooms
Electrical switch box
Water cold & hot
Gas (if available)
How many keys have been handed over, and which keys have been handed over?
Signature fields for buyer and seller
With a copy of this protocol for you and the buyer, you have concrete proof of the property being handed over. This should eliminate any future dispute, e.g., when it comes to supposedly concealed defects or missing keys.
If the property sold happens to be an apartment, it is important to let your management company know of the actual handover date and instruct them to cancel your SEPA direct debit mandate that was most likely active for the monthly payment of your maintenance fee. The buyer is liable for the maintenance fee from the official handover date. Make sure to evenly split the maintenance cost by breaking down the fee to a daily rate (relevant when the property is not handed over on the first day of the month but sometime in the middle of the month).
If you are selling a rented apartment, there is technically no actual handover day because the buyer takes over the 'economic liability' of the property on the day that the full purchase price is paid. There is no need for a formal handover protocol. From that day onwards, the buyer is entitled to the rental income paid by the tenant. The rent is to be split up similarly to the maintenance fee.
The 11 steps seem quite tedious to you. But they are worth it to ensure a smooth sale of your property at the optimal price. Just follow them step by step, and you will succeed! Should you ever struggle or have any questions, don't hesitate to contact a Hypofriend advisor. We are here to help!